Table of Contents
Introduction Dell Support Assist Pre-Boot System
Your laptop sits on the desk with an unfamiliar blue screen flashing. Error codes appear where Windows usually loads. The computer beeps once before shutting down. This moment demands immediate action because you need to know if your hardware failed or if something else caused the problem.
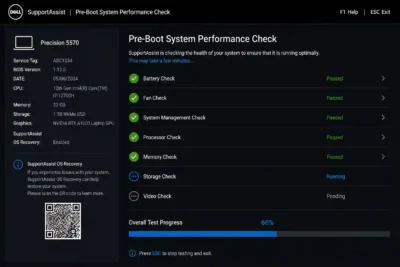
The Dell SupportAssist Pre-Boot System Performance Check tests core components before Windows starts loading. You can identify whether memory, storage, battery, fan, processor, or another part malfunctioned. This guide shows you how to launch the diagnostic tool and interpret results without replacing parts unnecessarily.
Step1: Identify What the Support Assist Pre-Boot Check Can Reveal
This diagnostic environment runs outside Windows, which matters when your operating system won’t load or crashes repeatedly. Unlike the Windows version that handles driver updates and optimization, the pre-boot check focuses strictly on hardware health. Your computer might show this screen automatically after a failed startup or when it detects certain issues.
Understand the difference between pre-boot diagnostics and Windows-based SupportAssist
Pre-boot diagnostics work when Windows cannot start properly or runs so poorly that software checks become impossible. The Windows application handles everything from driver updates to troubleshooting tips and optimization features. You get different test options depending on your Dell model, BIOS version, and installed hardware.
Recognize the warning signs that justify a diagnostic scan
You should run diagnostics when your computer fails to start, restarts repeatedly, or shows blue-screen errors. Other signs include overheating problems, abnormal fan noise, strange storage sounds, or battery charging failures. Intermittent freezes and memory errors also warrant testing before assuming software is the culprit.
A successful diagnostic does not guarantee perfect performance. Software issues, driver conflicts, firmware bugs, or operating system corruption can still cause problems even when hardware passes all tests. Back up your files immediately if your computer remains functional before running any diagnostic checks.
Prepare the Dell computer before starting the test
Connect your AC adapter whenever possible since some tests require stable power. Place your computer on a hard, ventilated surface away from soft fabrics that block airflow. Disconnect unnecessary USB devices and save all open work before beginning the process.
Do not interrupt the test unless your system clearly freezes or instructions tell you to cancel. Some components like batteries, fans, or storage drives may need extended testing time. Rushing through these checks could miss critical issues.
Step2: Launch the Dell Support Assist Pre-Boot System Performance Check
Different Dell models might use slightly different menu wording, but the general process stays consistent across most systems. Follow these steps to access the diagnostic environment properly.
Open the One-Time Boot Menu
Power off your Dell computer completely before attempting to enter the boot menu. Press the power button and begin tapping F12 repeatedly as soon as the Dell logo appears. You will see the One-Time Boot Menu if you time your key presses correctly.
Select Diagnostics from the menu options to begin the hardware assessment process. If you press F12 too late, Windows starts normally and you must shut down again to retry. Start tapping F12 immediately after powering on rather than holding the key down continuously.
Start the SupportAssist diagnostic environment
Your computer performs a brief hardware scan automatically after selecting Diagnostics. Progress indicators appear on screen while the system evaluates various components. You might see prompts asking whether a problem exists or requesting permission to continue testing.
Some systems display “SupportAssist Pre-Boot System Performance Check” while others use labels like ePSA or PSA. Read every prompt carefully because missing a message could skip important diagnostic steps or prevent you from recording error information.
Choose between the quick assessment and advanced testing
Let the automated quick scan finish first unless you already know which component needs specific testing. Advanced tests let you target particular areas like memory modules, hard drives or solid-state drives, batteries, cooling fans, processors, motherboards, video output, or keyboards.
Run only the tests matching your symptoms instead of checking every available option repeatedly. Document results for each test so you can report accurate information to Dell support later.
Step3: Complete the Diagnostic Scan Without Losing Important Results
Monitoring the assessment closely helps you capture valuable troubleshooting information that Dell support teams need. Interactive prompts may appear during certain tests requiring your input or approval.
Monitor the scan and handle interactive prompts
Tests sometimes need user actions like confirming display colors or pressing keyboard keys in sequence. Keep your computer connected to power throughout storage or memory testing phases. Forced shutdowns during these procedures could corrupt test data or miss detected issues.
Progress bars might pause temporarily while switching between components. This normal behavior means the diagnostic is working through your system thoroughly. Photograph error screens immediately if you cannot copy or save the information digitally.
Record the error code, validation code, and affected component
Error codes and validation numbers provide the essential details Dell support needs to help you effectively. Write down these specific pieces of information:
- Error code showing the failure type
- Validation code proving test conditions
- Service Tag identifying your exact device
- Express Service Code if shown on screen
- Name of the failed component
- Specific test name that triggered the error
- Any recommended next steps listed
A standalone error code lacks context without the validation code and Service Tag for warranty verification. Capture the complete diagnostic display rather than writing just one number you see first.
Finish the test and review the final status
Results typically show either a passed assessment indicating no issues found, a failed test highlighting hardware faults, an interrupted process, or incomplete testing scenarios. Choose the appropriate option to continue running targeted tests, exit back to Windows, retry failed checks, or perform extended diagnostics based on what you observe.
Passing a basic scan means the tested components worked under those specific conditions at that moment. It does not guarantee permanent reliability or confirm every single component functions perfectly forever.
Step4: Interpret Support Assist Results and Match Them to the Right Fix
Understanding diagnostic outcomes helps you determine the correct response without wasting money on unnecessary repairs. Each result points toward different potential solutions.
Respond correctly when all hardware tests pass
When diagnostics show no hardware failures, investigate Windows-related causes instead. Restart your computer normally and verify whether original symptoms persist after rebooting. Check the official Dell Support website for BIOS and driver updates matching your exact model. Review Windows Event Viewer logs for additional clues about software issues.
Do not replace any component simply because your computer runs slowly if hardware diagnostics show everything works fine. Slow performance often stems from corrupted files, malware infections, application conflicts, or thermal throttling rather than actual component failure.
Investigate storage-related errors
Hard drive or solid-state drive failures present serious risks for data loss. Stop using your computer immediately when storage errors appear to prevent further damage. Backup accessible files right away while preserving all diagnostic codes for future reference.
Storage problems frequently cause slow startups, missing files, application crashes, blue screens, or complete boot failures. Failed drives often require replacement, operating system reinstallation, or professional data recovery services depending on the extent of damage and backup availability.
Investigate memory, battery, fan, and system-board errors
Each component connects to specific symptoms and safe resolution paths. Memory failures produce unexpected crashes, freezing behavior, blue-screen errors, or installation problems. Run relevant tests again if prompted and document all findings for reporting purposes.
Battery issues manifest as reduced runtime, charging problems, physical swelling, or sudden shutdowns. Stop using computers immediately if batteries appear swollen or physically damaged and seek service promptly. Fan or thermal warnings indicate overheating risks leading to throttling or emergency shutdowns. Clear blocked vents and schedule repairs if fans malfunction. System board or processor errors generally need professional repair or Dell assistance rather than repeated software attempts.
Step5: Resolve Common Problems When the Diagnostic Will Not Run
Sometimes technical obstacles prevent the F12 menu, SupportAssist interface, or diagnostic scans from functioning properly. Recovery steps exist for these situations.
Recover when F12 does not open the boot menu
Timing issues, keyboard malfunctions, Fast Boot settings, docking stations, or unrecognized external keyboards commonly block menu access. Shut down completely, try the built-in keyboard, remove unnecessary USB devices, and tap F12 repeatedly at the Dell logo screen. Accessing BIOS with F2 lets you verify keyboard recognition but avoid changing unfamiliar settings without guidance.
Handle a frozen, interrupted, or failed diagnostic
Wait briefly to determine whether tests are still progressing before taking drastic action. Use on-screen cancellation options if available rather than forcing shutdowns. Only force power-off when the system remains unresponsive after exhausting all safer alternatives.
Reconnect your AC adapter, disconnect nonessential peripherals, and rerun the diagnostic once. Repeated interruptions make troubleshooting less reliable and might prevent tests from completing successfully.
Use Dell’s official support channels after a confirmed failure
Enter your recorded error codes and Service Tag on Dell Support to check warranty coverage and service options. Provide exact diagnostic evidence describing what happened instead of vague statements like “the computer is broken.” Professional service becomes necessary for failed motherboards, processors, internal memory, swollen batteries, liquid damage, or systems remaining unsafe to operate.
Step6: Prevent Repeat Hardware Warnings and Improve Diagnostic Accuracy
Maintaining good habits reduces avoidable failures and makes future troubleshooting simpler and faster. These practices keep your Dell computer running smoothly over time.
Keep BIOS, firmware, drivers, and Windows updated carefully
Updates address compatibility problems, stability issues, power management concerns, and device recognition glitches. Download only from Dell or Microsoft official channels rather than third-party sources. Confirm your exact Dell model or Service Tag before installing any BIOS or firmware changes. Never interrupt BIOS updates or disconnect AC power during these critical processes.
Protect the system from heat, impact, and power problems
Dust accumulation blocks ventilation while soft surfaces trap heat against laptop chassis. Physical shocks and liquid exposure damage internal components instantly. Use the correct Dell AC adapter and ensure air vents remain completely unobstructed. Address unusual heat buildup or fan noise immediately before problems worsen. Swollen batteries, smoke, burning smells, or liquid contact require immediate shutdown and professional service.
Maintain backups and a record of hardware health
Diagnostics identify hardware problems but cannot protect your data from loss. Maintain current backups of all important files stored separately from your computer. Save previous error codes, repair dates, and replaced component information in a simple log. Include symptom descriptions, test dates, diagnostic results, error numbers, and actions taken for future reference.
FAQs for Dell Support Assist Pre-Boot System Performance Check
What exactly is the new Support Assist pre-boot diagnostic tool?
It scans your entire hardware system before Windows loads up. You find internal errors early using this helpful method too.
Does the automatic scan start every time you turn on your PC?
No, the main program runs only when you set it up first. Other system errors might start it without any user action.
How do you launch the diagnostic tool manually on your laptop?
Press F12 right during startup to pick your options screen. Select the SupportAssist option clearly from that boot menu list. Make sure you watch all screen prompts carefully here now.
Can I skip the full test if it takes too long?
Yes, you can press Esc to bypass the complete system scan. Then your computer will load the main Windows version normally.
What should I do if the check actually finds problems?
Save the report details for your support team members later. Tech staff will fix failed hardware parts very quickly these days.
Conclusion: Use the Dell Pre-Boot Check to Turn Startup Symptoms Into Clear Next Steps
The Dell SupportAssist Pre-Boot System Performance Check proves most valuable when Windows refuses to start or hardware failure seems likely. You connect power, press F12 at startup, select Diagnostics, let scans complete, run targeted tests as needed, and record every error and validation code encountered.
Respond appropriately to each outcome: investigated software and drivers when tests pass, protected data and arranged repairs for storage or memory failures, and stopped unsafe usage when batteries, fans, processors, or motherboards fail. Accurate documentation and early backups minimize downtime, prevent unnecessary data loss, and help Dell support identify correct repairs quickly.